YouTube Dimensions in 2026: Video, Shorts, Thumbnail and Banner Sizes in One Place
Every YouTube dimension that matters in 2026: video resolutions and aspect ratios, Shorts sizing, thumbnail and banner specs, plus safe areas, all with links to exact per-format spec sheets.
On this page (8)
If you want your videos to look crisp and professional on YouTube, start with the right dimensions. The go-to standard is 1920x1080 pixels, which fits the common 16:9 aspect ratio. Nailing this from the start ensures your content looks great everywhere, from a big desktop monitor to a small phone screen.
Your Quick Reference for YouTube Video Dimensions
All specs here were re-verified against YouTube's documentation in July 2026.
| Format | The short answer | Exact spec sheet |
|---|---|---|
| Standard video | 16:9, upload 1920x1080 or higher | YouTube video size |
| Shorts | Vertical 9:16, up to 3 minutes | YouTube Shorts size |
| Thumbnail | 16:9, custom image recommended | YouTube thumbnail size |
| Channel banner | One image that scales across TV, desktop and mobile | YouTube banner size |
| Playlist thumbnail | 1:1 square, unlike the 16:9 video thumbnails | see the thumbnail guide |
Each spec sheet above is verified against YouTube's current documentation and kept up to date, so this guide focuses on the decisions: which resolution to master in, when vertical beats widescreen, and the mistakes that quietly cost views.
Standard YouTube Video Resolutions for 16:9 Aspect Ratio
YouTube's standard player aspect ratio on computers is 16:9. The recommended encodes, straight from YouTube's documentation:
- 2160p (4K): 3840x2160
- 1440p (2K): 2560x1440
- 1080p (Full HD): 1920x1080, the practical default for most channels
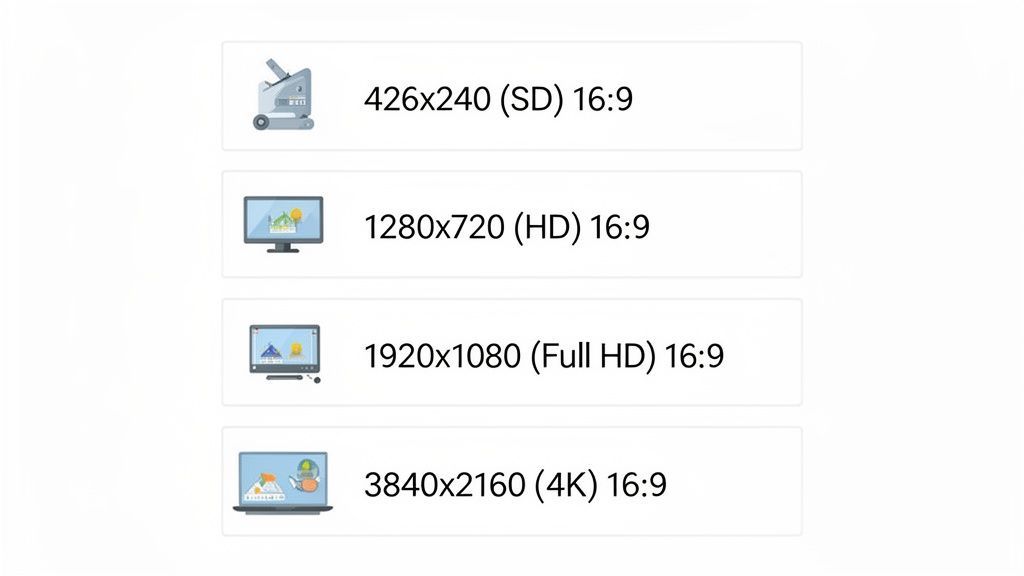
- 720p (HD): 1280x720
- 480p / 360p / 240p: 854x480, 640x360, 426x240, legacy sizes you should not master in
Worth knowing: since 2022 YouTube has been phasing out playback support for the odd resolutions between 4K and 8K, so master in 1080p, 1440p or 4K and skip 5K.
Understanding YouTube Aspect Ratios
Think of a video's aspect ratio as the shape of its frame. It’s the simple relationship between its width and height, and getting it right is the first step to making your videos look professional.
If you choose the wrong one, you end up with those clunky black bars on the sides or top and bottom of your video. It’s distracting, and it screams amateur.
For most standard YouTube videos, 16:9 is the gold standard. This is the widescreen format everyone is used to on their TVs and computer monitors, making it perfect for pretty much anything from cinematic vlogs to in-depth tutorials. It’s wide, immersive, and what your audience expects.
But people watch videos everywhere now, and YouTube has evolved. That’s why you need to know about the other key aspect ratios.
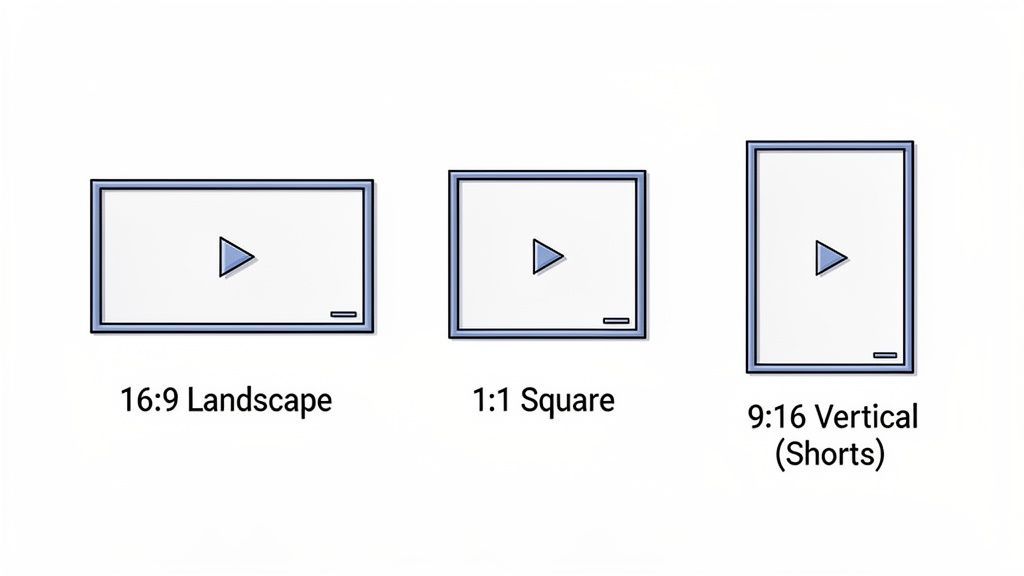
The Three Main Aspect Ratios
The right format always comes down to where and how you want people to see your video. It’s all about matching the content to the context.
-
16:9 (Landscape): This is your bread and butter. It's the go-to for standard, long-form videos that live on your main channel. It’s the default for YouTube’s desktop and TV players, delivering that classic, cinematic experience.
-
9:16 (Vertical): Built from the ground up for mobile, this is the format for YouTube Shorts. It fills the entire phone screen, making for a much more engaging and seamless experience when someone is scrolling through the Shorts feed.
-
1:1 (Square): A solid middle ground, square video is super versatile. It plays well in feeds and looks good on other social platforms. While YouTube will add bars to it on a desktop, it takes up a ton of screen real estate on a mobile feed, which is a big plus.
Of course, sometimes your footage doesn't quite match the format you need. That's why it's incredibly useful for creators to know how to change the aspect ratio of a video without losing quality. You might need to turn a 16:9 clip into a vertical Short, and knowing how to reframe it properly is key.
The goal is always to make your video’s shape fit the viewer’s screen perfectly. A well-framed video just feels right, it keeps your audience focused on your message, not on awkward black bars.
A Complete Breakdown of Standard Video Dimensions
When it comes to standard, horizontal YouTube videos, getting the pixel dimensions right is the first step to a crisp, professional-looking upload. While YouTube is pretty flexible, you should always aim to upload in the highest resolution you can. This makes your content look great today and future-proofs it for tomorrow's screens.
The most important dimension to get right is 1920x1080 pixels. You'll know this as Full HD or 1080p.
This resolution is the sweet spot. It delivers fantastic clarity without creating massive files that bog down your editing and upload times. It’s the standard for a reason, it looks sharp on everything from a phone to a big desktop monitor. In Bulgaria, for instance, the most common screen resolution is 1920x1080, so targeting this size is a no-brainer for engaging local viewers. You can dig into the numbers and see the detailed screen resolution stats to get a better feel for your audience's setup.
From Standard Definition to 4K
Beyond 1080p, YouTube supports a whole spectrum of resolutions. Knowing these helps you match your export settings to what you actually filmed.
Here’s a quick rundown of the most common horizontal video dimensions:
- 4K (Ultra HD): 3840 x 2160 pixels
- 1440p (QHD): 2560 x 1440 pixels
- 1080p (Full HD): 1920 x 1080 pixels
- 720p (HD): 1280 x 720 pixels
- 480p (SD): 854 x 480 pixels
- 240p (Minimum): 426 x 240 pixels
These horizontal sizes are the foundation of most channels, though vertical video is obviously huge for mobile. If you're all-in on vertical, check out our complete guide to YouTube Shorts dimensions for specs tailored to that format.
Why the Safe Area Matters
Don't forget about the safe area. Think of it as the central part of your video that's guaranteed to be visible on any device, no matter how YouTube’s player controls or different screen shapes crop the edges.
Always keep your most important stuff like text, logos, or key actions inside this central zone. It’s a simple habit that stops crucial info from getting cut off, ensuring every viewer sees exactly what you intended.
Getting Your YouTube Channel's Visuals Right
Your channel’s branding is the first handshake you have with a potential subscriber. Long before they click play on a video, they see your profile picture, your channel banner, and your thumbnails. Nail these non-video dimensions, and you create a polished, professional identity that shows viewers you mean business.
First impressions are everything. A sharp, well-designed channel page can be the difference between a quick glance and a new subscriber. Each visual element has its own set of specs, and getting them right is crucial for a clean look on any device.
Your Channel's Essential Dimensions
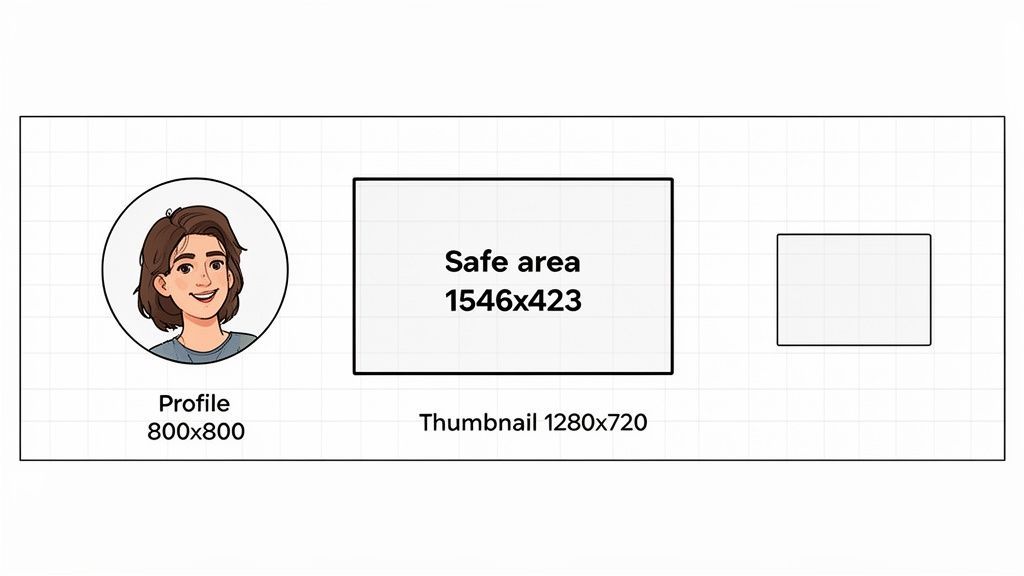
Channel art has one job: look right on every screen at once. The banner is the tricky one because a single image has to survive TV, desktop, and mobile crops, which is why the safe-area concept matters more than any single pixel number. The exact current dimensions and safe zones live in our YouTube banner size guide, and your profile picture requirements are in the same family of spec sheets.
One exception worth memorizing: playlist thumbnails use a square 1:1 ratio, not the 16:9 of video thumbnails, so artwork designed for one gets cropped in the other.
The Power of the Perfect Thumbnail
Thumbnails are the highest-leverage image on YouTube: they decide clicks before your first frame plays. Three rules that survive every redesign: faces and high contrast outperform screenshots, text must stay readable at the size of a postage stamp, and the composition should still work when the duration badge covers the bottom-right corner.
The current pixel dimensions, file-size limit, and format list are maintained in our YouTube thumbnail size guide. If you need to crop an existing image or frame to spec, the free YouTube cropper does it in the browser.
Technical Specifications for Flawless Uploads
Getting the youtube dimensions video settings right is a huge step, but a few other technical details can make or break your final quality. Think of these specs as the engine under the hood. They control everything from file size to how crisp your video looks after YouTube is done processing it.
The most important setting here is the video codec, which is just the method used to compress your video file. For the best balance of quality and file size, YouTube strongly recommends using H.264. It’s the industry standard for a reason, delivering excellent results without creating enormous files.
For audio, the go-to codec is AAC-LC (Advanced Audio Codec - Low Complexity). This ensures your sound comes through clearly and without any weird digital artifacts, which is every bit as important as the picture.
Choosing the Right Frame Rate and Bitrate
Next up are frame rate and bitrate. These two settings have a direct impact on the smoothness and detail of your video, so they're worth getting right.
Frame Rate (fps) This is simply the number of individual images, or frames, shown every second. While YouTube accepts a bunch of different frame rates, it's always best to export and upload using the same rate you recorded in. The most common ones you'll see are:
- 24 fps: This gives you that classic, cinematic look.
- 30 fps: The standard for most online video and what you'd typically see on TV.
- 60 fps: Ideal for capturing fast motion, like in gaming or sports videos, resulting in super-smooth playback.
Bitrate Bitrate determines how much data is used to encode one second of your video. A higher bitrate means better quality, but it also means a much larger file size. If your bitrate is too low, you'll start to see ugly compression artifacts, like blockiness in dark scenes or a general "mushy" look.
Here are some recommended bitrates for a standard frame rate (24, 25, 30 fps) upload:
- 4K: 35–45 Mbps
- 1440p: 16 Mbps
- 1080p: 8 Mbps
- 720p: 5 Mbps
Getting these technical settings dialed in is a core part of the creation process. For creators looking to master every step, from shooting to uploading, there are some essential video production best practices that can make a huge difference in the final product.
While these specs are crucial for standard landscape videos, the technical needs for vertical content can differ slightly. For an in-depth look, our guide to the https://postfa.st/api-guides/youtube/shorts offers more specific details for that format. Mastering these specifications ensures every upload is flawless.
Common Dimension Mistakes and How to Avoid Them
Even experienced creators get tripped up by YouTube’s dimension rules. A few common slip-ups can tank your video’s quality, but the good news is they’re easy to fix once you know what to look for. Nailing these details is what makes your content look sharp and professional every single time.
One of the most common mistakes is uploading in the wrong aspect ratio. When your video’s shape doesn’t fit YouTube’s standard 16:9 player, the platform slaps black bars on it to fill the gaps. We call this letterboxing (bars on the top and bottom) or pillarboxing (bars on the sides). It instantly makes your work look amateurish and distracts your viewers.
Another classic pitfall is exporting with a bitrate that’s too low for the resolution. This one is a killer. A low bitrate creates nasty compression artifacts, think blocky shadows or a general fuzzy look, and completely undoes all the hard work you put into shooting in high definition.
Simple Fixes for a Better Workflow
The easiest way to prevent these issues is to build a quick pre-upload checklist. Double-checking a few settings in your video editor before you export can save you from the headache of re-rendering and re-uploading.
Here are the key things to lock in:
- Check Your Project Settings: Right from the start, make sure your project is set to the correct YouTube dimensions video size. For a standard landscape video, that means 1920x1080.
- Confirm Export Settings: Before you hit that final render button, give your export settings one last look. Confirm the resolution, aspect ratio, and bitrate all match YouTube's recommendations. This quick glance makes a world of difference.
- Mind the Safe Area: For your channel art, always design with the 1546 x 423 pixels safe area in mind. Keeping your logo and key text inside this central zone ensures nothing important gets cut off on smaller screens.
Staying on top of these small details is what separates good content from great content. A consistent, polished presentation builds trust with your audience and keeps them focused on your message, not on weird technical glitches.
Managing Video Dimensions with PostFast
Wrangling different video dimensions for YouTube and other platforms is a massive time sink. You’ve got horizontal videos for your main channel, vertical clips for Shorts, and maybe even square posts for other feeds. Re-editing the same content over and over is a drag. This is exactly where a smarter workflow saves the day.
Instead of manually reformatting every single video, a tool like PostFast simplifies your whole content strategy. The cross-platform publishing tools are built to help you adapt one video for multiple destinations without the headache. That means you can get back to creating, not endlessly tweaking technical specs.
Imagine scheduling your main 16:9 YouTube video and, right from the same dashboard, queueing up a perfectly cropped 9:16 version for YouTube Shorts. That’s the kind of automation that gives creators hours of their week back. By connecting your workflow, you can keep a solid presence everywhere without burning out.
This doesn't just speed things up. It makes sure every video looks its best on the platform it’s meant for, which is a huge boost for engagement. To see exactly how it works, check out the direct YouTube integration with PostFast.
Got Questions About YouTube Dimensions?
We've covered a lot of ground, but you might still have a few lingering questions. Here are some quick, straight-to-the-point answers to the most common things creators ask about getting their YouTube dimensions right.
What’s the Best Video Dimension for YouTube?
For your standard, horizontal videos, you can't go wrong with 1920x1080 pixels. That's Full HD, and it hits the sweet spot between fantastic quality and manageable file sizes.
If you're making YouTube Shorts, the only dimension that really works is 1080x1920 pixels. It's designed to fill up a vertical phone screen perfectly.
What Happens If I Upload a Video with the Wrong Dimensions?
YouTube won't reject your video, but it will try to "fix" it by forcing it into a standard 16:9 player. The result? You'll get those ugly black bars.
It's called pillarboxing if the bars are on the sides, or letterboxing if they're on the top and bottom. Either way, it makes your video look amateurish and can really pull viewers out of the experience.
Can I Upload a 4K Video to YouTube?
Absolutely. YouTube loves 4K uploads, which are 3840x2160 pixels.
Uploading in 4K not only gives your audience the absolute best quality but also has a nice side effect: it makes your 1080p version look better. Why? Because YouTube's compression algorithm has a much higher-quality source file to work with from the start.
Juggling all these different dimensions for every platform can feel like a full-time job. It doesn’t have to. With PostFast, you can schedule your content once and let it repurpose your video for every format you need. Give the free trial a spin and see for yourself.
Related articles

Hermes Agent vs OpenClaw (2026): Which AI Agent Should You Run?
Hermes Agent vs OpenClaw in 2026: adoption, skills, MCP, security, and pricing compared side by side. Plus where NanoClaw fits and how to choose.

How to Automate Social Media Posts: The Practical Guide
Learn how to automate social media posts the right way: what to automate, what to keep human, a step by step afternoon setup, and where AI helps or hurts.

How to Automate Social Media Posting with n8n (Free Templates + Verified Node)
Automate social media posting with n8n: install the verified PostFast node, start from free templates, upload media, schedule carousels, and add approval.

Best AI Tools for Social Media Management in 2026 (Honest Guide)
The best AI tools for social media management in 2026: honest picks for drafting, scheduling and agent-run workflows, plus copy-paste ChatGPT prompts.

10 Ways to Make Money with AI in 2026 (Ranked by Realism)
The ways to make money with AI in 2026 that actually work, ranked by realism: AI-powered services, content systems, products and the traps to skip.

How to Make Money on Social Media in 2026: 8 Models That Actually Pay
How to make money on social media in 2026: the 8 income models, real platform payout thresholds compared, and the consistency math behind creators who earn.